Really interested in getting the IoTaWatt installed at my place.
I have read a few of the posts relating to Australia but still have a few questions.
Just a few questions before I purchase and get my sparky to install it.
Has anyone had issues fitting the CT clamps behind the panel? worried it might be to tight.
Would “upgrading” (more cleaning up) my fuse panel be advised?
I have a Goodwe 6.6KW solar system installed what would be the best way to show this in something like grafana or home assistant, would like to easily visualize it agaisnt import/export on my house as people other than me would be viewing it.
Would I only need 1 100amp CT Clamp?
I was thinking of getting a enclosure from Altronics HERE and getting the sparky to place it to the left of the fuse box and run conduit to the fuse box.
Overall I was thinking I would need the main unit, 1x100AMP Clamp and 9x50AMP Clamps.
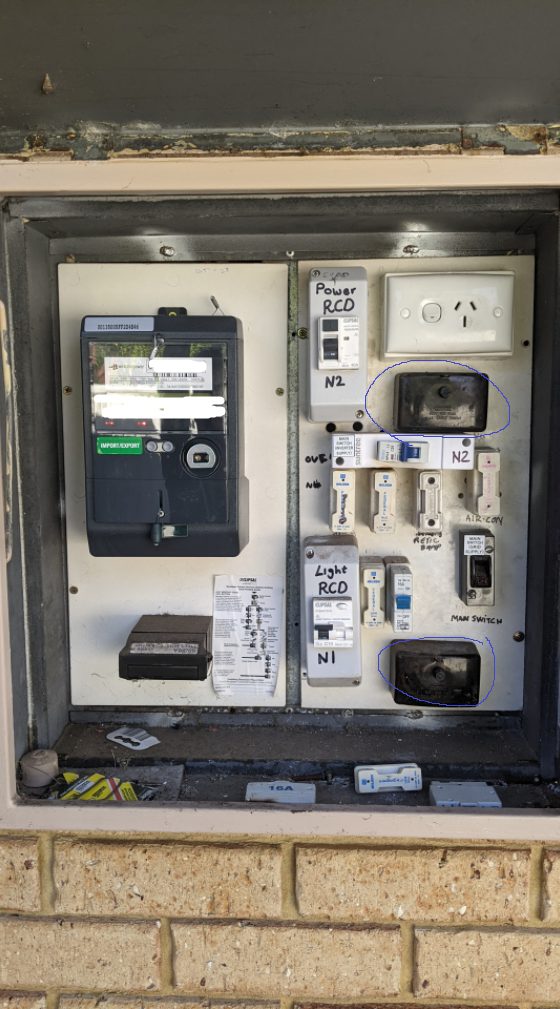
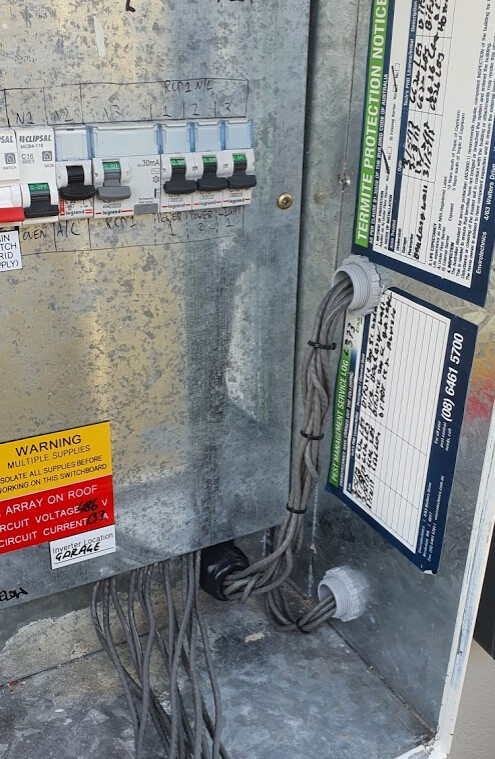
Can anyone let me know what the black boxes highlighted in blue are?
If you can think of any other tips before I go ahead and give my sparky a call and purchase the IoTaWatt that would be great, looking forward to getting this setup.
Switchboards in each state (and with a state) are different but hopefully my comments below help.
Hard to say till you look behind board but my board is a similar size and there was plenty of room.
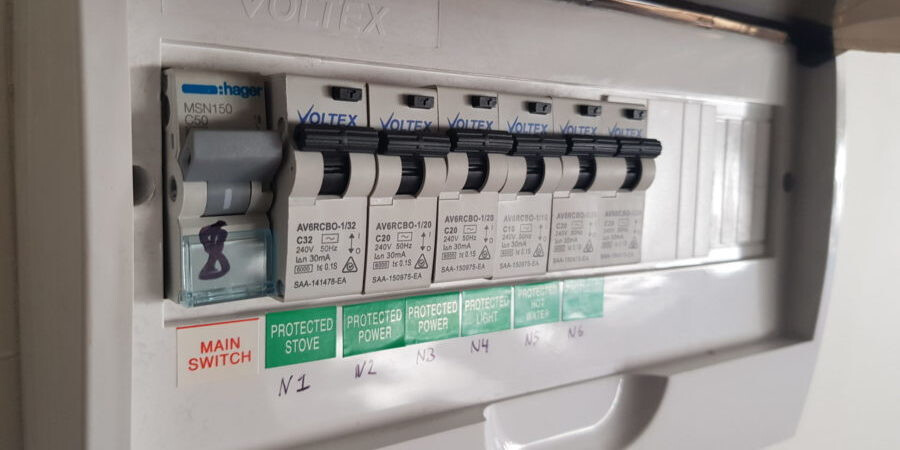
Not essential to tidyup board unless you need to create room or are looking to make other changes (eg adding circuits for some other reason). Not clear if every circuits is protected by a RCD, if not then a tidy up would include this and be a safety upgrade. The porcelean fuses would also be replaced by CBs which are better, not that fuses are bad (there are millions still in service) but the better approach and modern standard is CBs.
Pvoutput is easy to setup and free unless you want to extra features, Grafana will also work but needs Influx to store the data. You need a server where you can install grafana and influx or pay for a hosted service - complicated unless you like this stuff
You have a single phase 100A supply so only require one 100A CT however a 50A will also work as its unlikely you will be drawing anything like 50A anyway.
Enclosure is a good idea.
The black and blue boxes look like links, one for actives and one for neutrals. They will contain a little busbar where the main active and main neutral come in and each subcircuit active and neutral exit from (active would go to fuse/cb).
Change the powerpoint to a double so you can use one side for VT and other as Iotawatt power source.
I am also looking at changing all the switches in the house to smart switches. These requires a neutral and currently my switches don’t have the neutral run to the switch.
Would changing from non-neutral switches to neutral based ones require anything to be done on the fuse panel? if it does getting them done at the same time would be best.
I am running home assistant on a proxmox server and am not afraid to play with hosting or cloud services but have never touched grafana so it would be a learning experience(but im sure people here would be helpful and there would also be a few guides around)
My Solar PV switch has a burn mark on it(I assume from being to close to other fuses) so I am looking at upgrading the fuse box to use CBs do these generate as much heat as old porcelan fuses? When the sparky is in there I would obvsiouly get him to space it all out better.
No changes required at the fuse panel to run a neutral to each switch. It will be a big (costly) job to run a neutral to each switch - you basically have to run a new wire to every switch and while wire is cheap the effort to run it in an existing house is high.
You will have no problem setting up Influx and Grafana then - just a learning curve for some new software.
You can still try PVoutput - you can get it running in half hour and it gives you graphs and data that are web accessible. I found it useful to start with PVoutput graphs to see how best to display the data and then used that as a model to create grafana graphs and dashboards. It takes some time to get your head around how you can do the same on grafana but it is very powerful and customisable. My own experience is that while I initially created a lot of grafana graphs, I can get everything I need from Iotawatt built in graphs and PVoutput and thats all I use now.
A switch with a burn mark in fact anything with burn marks in a switchboard is something to be investigated. Your electrician can look at this. Porcelain fuses in everyday operation do not generate heat, when they blow there will be an arc and heat for a very short period of time (milliseconds) and it would be (should be) contained inside the ceramic cartridge body.
CBs will not generate any noticeable or problematic heat.
I couldn’t find a good picture but your electrician would strip everything off the right hand side of the board and install a modular system like this, probably with two rows to provide enough room.
Hey mate, im in Perth too and going through similar install.
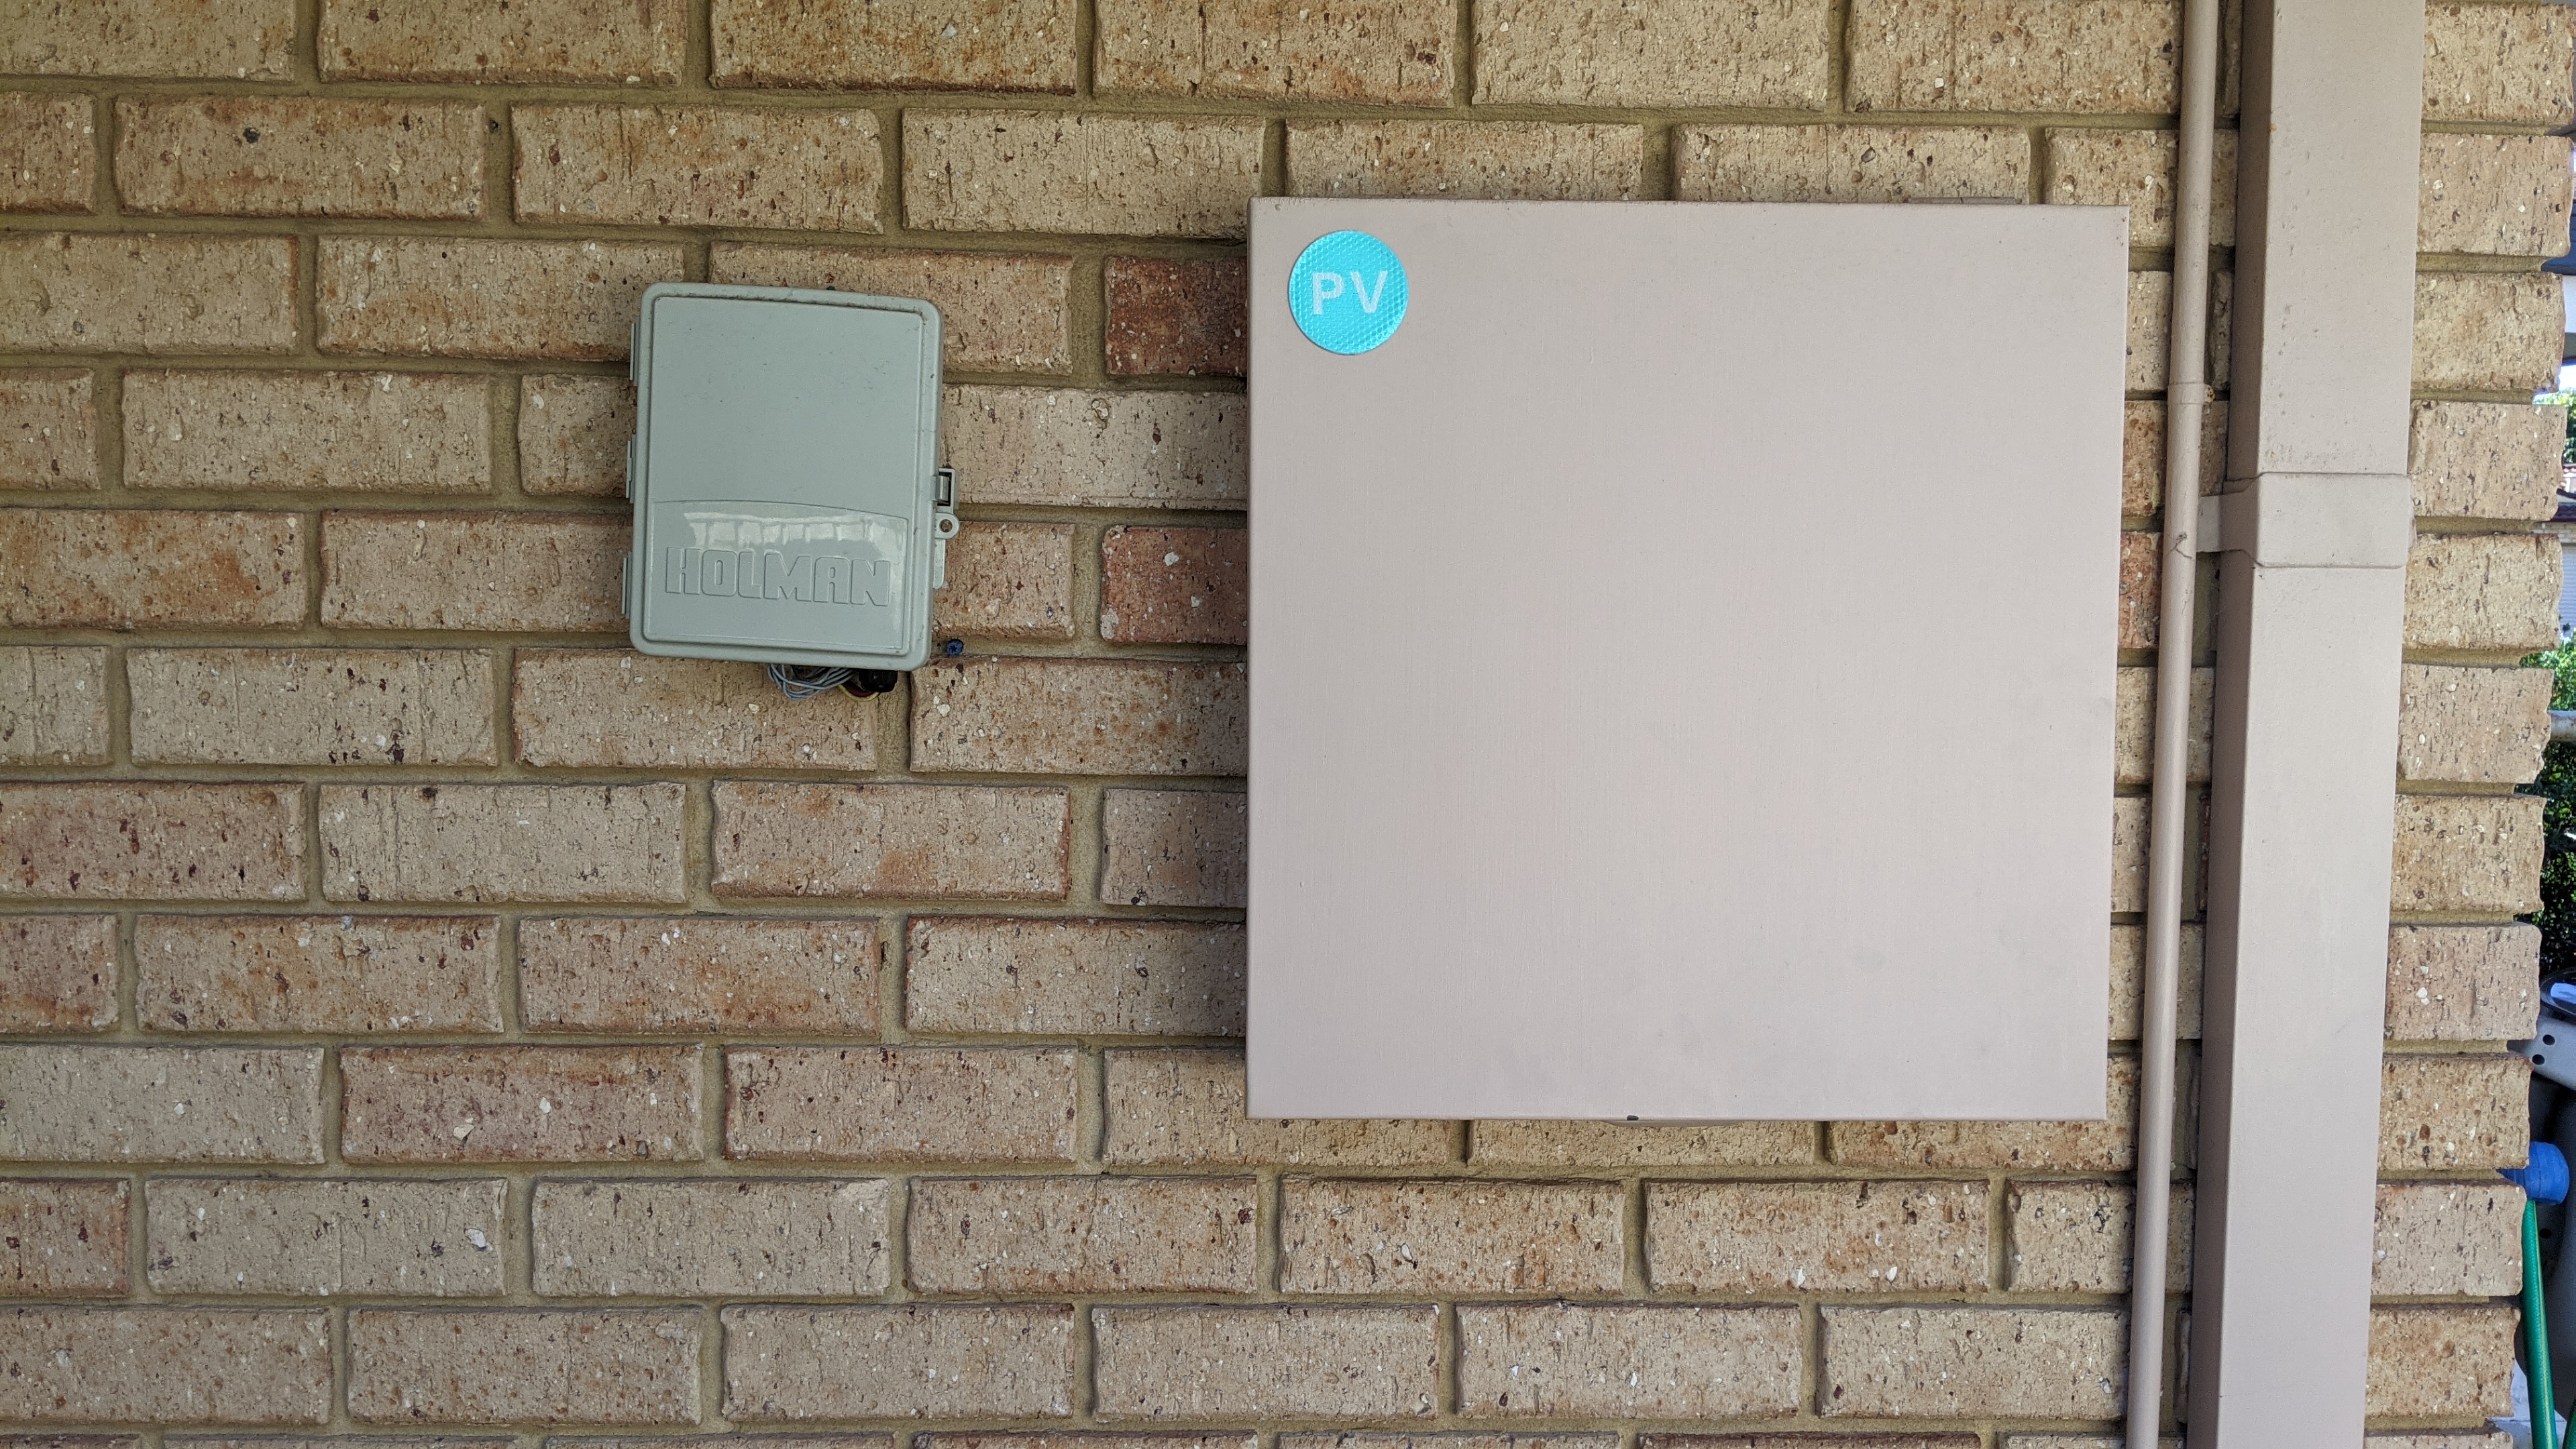
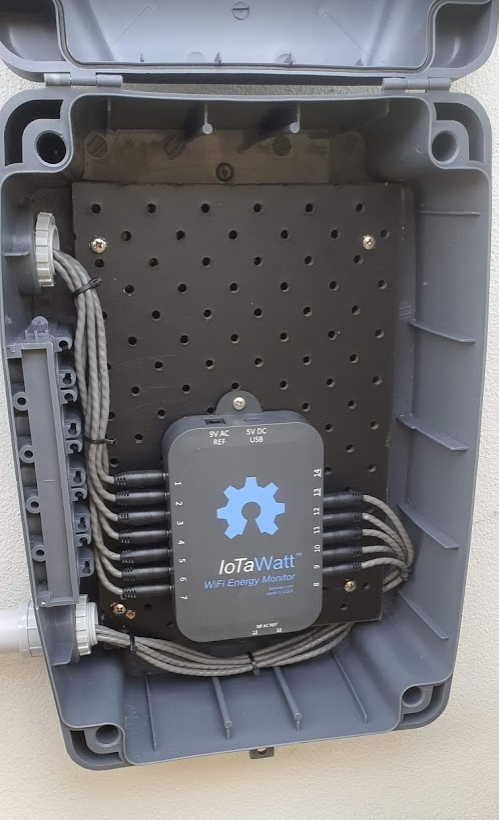
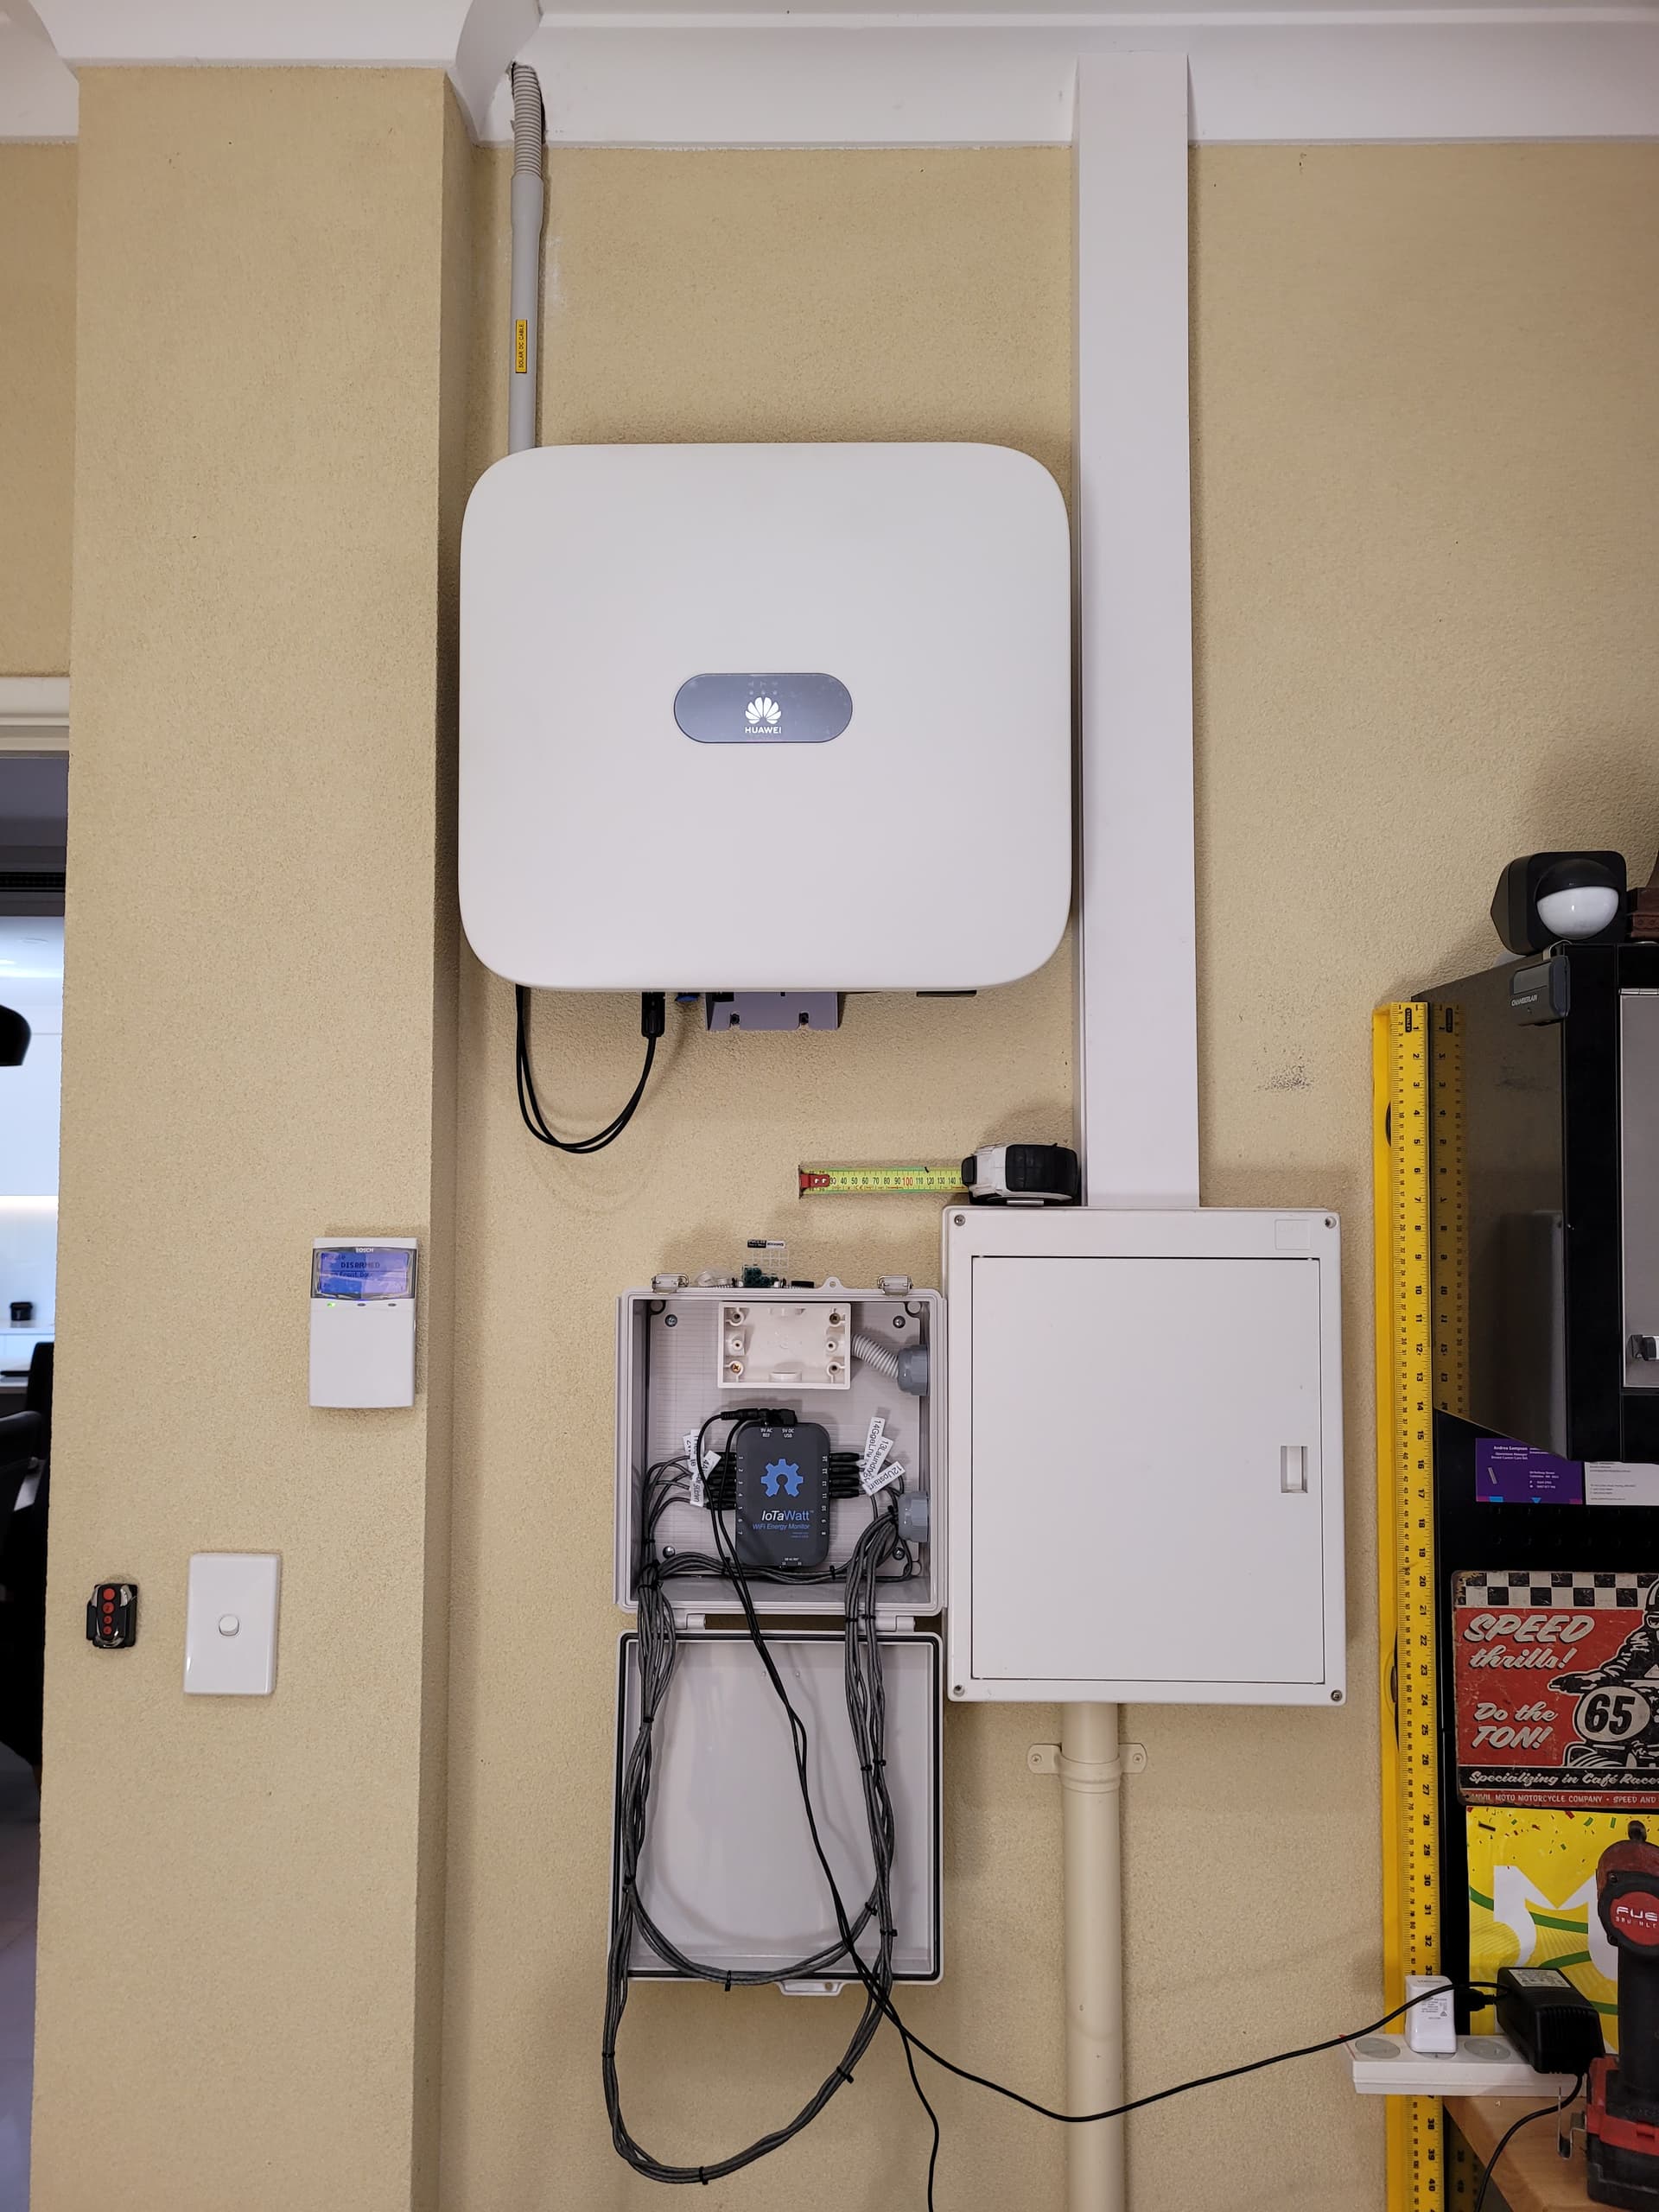
I ended up getting an outdoor rated box from bunnings ($25) to house the iotawatt and a double GPO (not yet installed, but have left room for it above). I routed the CTs through 2x 25mm conduit and glanding to the main meter box, and through another gland into the rear of the panel to connect the CTs.
I ended up buying 1x 100A and 9x 50A CTs, which should do the whole house.
I still have to get a sparky to connect up the CTs and install a double GPO, but happy with what i’ve done so far. Hopefully gives you some ideas.
Hey Guys
Iam from Perth too. My IoTaWatt has just arrived after months of waiting.
@dopacak - my meter box looks nearly identical to yours.
I’ve got a single GPO already on the DIN rail, so I will probably put a powerboard in. I also want to monitor my gas and water usage. That Bunnings enclosure looks exactly what I want.
Did you guys get the 3 amp Micro USB for power? Jaycar has a 2.5 A one.
Hey Prisoner, I’m also in Perth. I used an existing USB adapter so can’t help you there but I bought the recommended reference power pack from Jaycar. The problem with the Jaycar USB adapters was they were USB type C connectors from memory.
I tried the Bunnings enclosure (when I finally found one) and didn’t like it. Went with a really sturdy equipment box from a local importer. I can swing you the name if you need it.
I went with the 280x280x130 which is not the one in the photo on that web page because they just use a generic photo but it’s basically the same build. Local guy who imports a ton of electrical and data cabling stuff. I also bought my glands from him.
It would fit the IoTaWatt but not the GPO as well. 280 was ok vertically with my setup and with a bit of bend on the CT cables, 270 wide would be minimum I reckon.
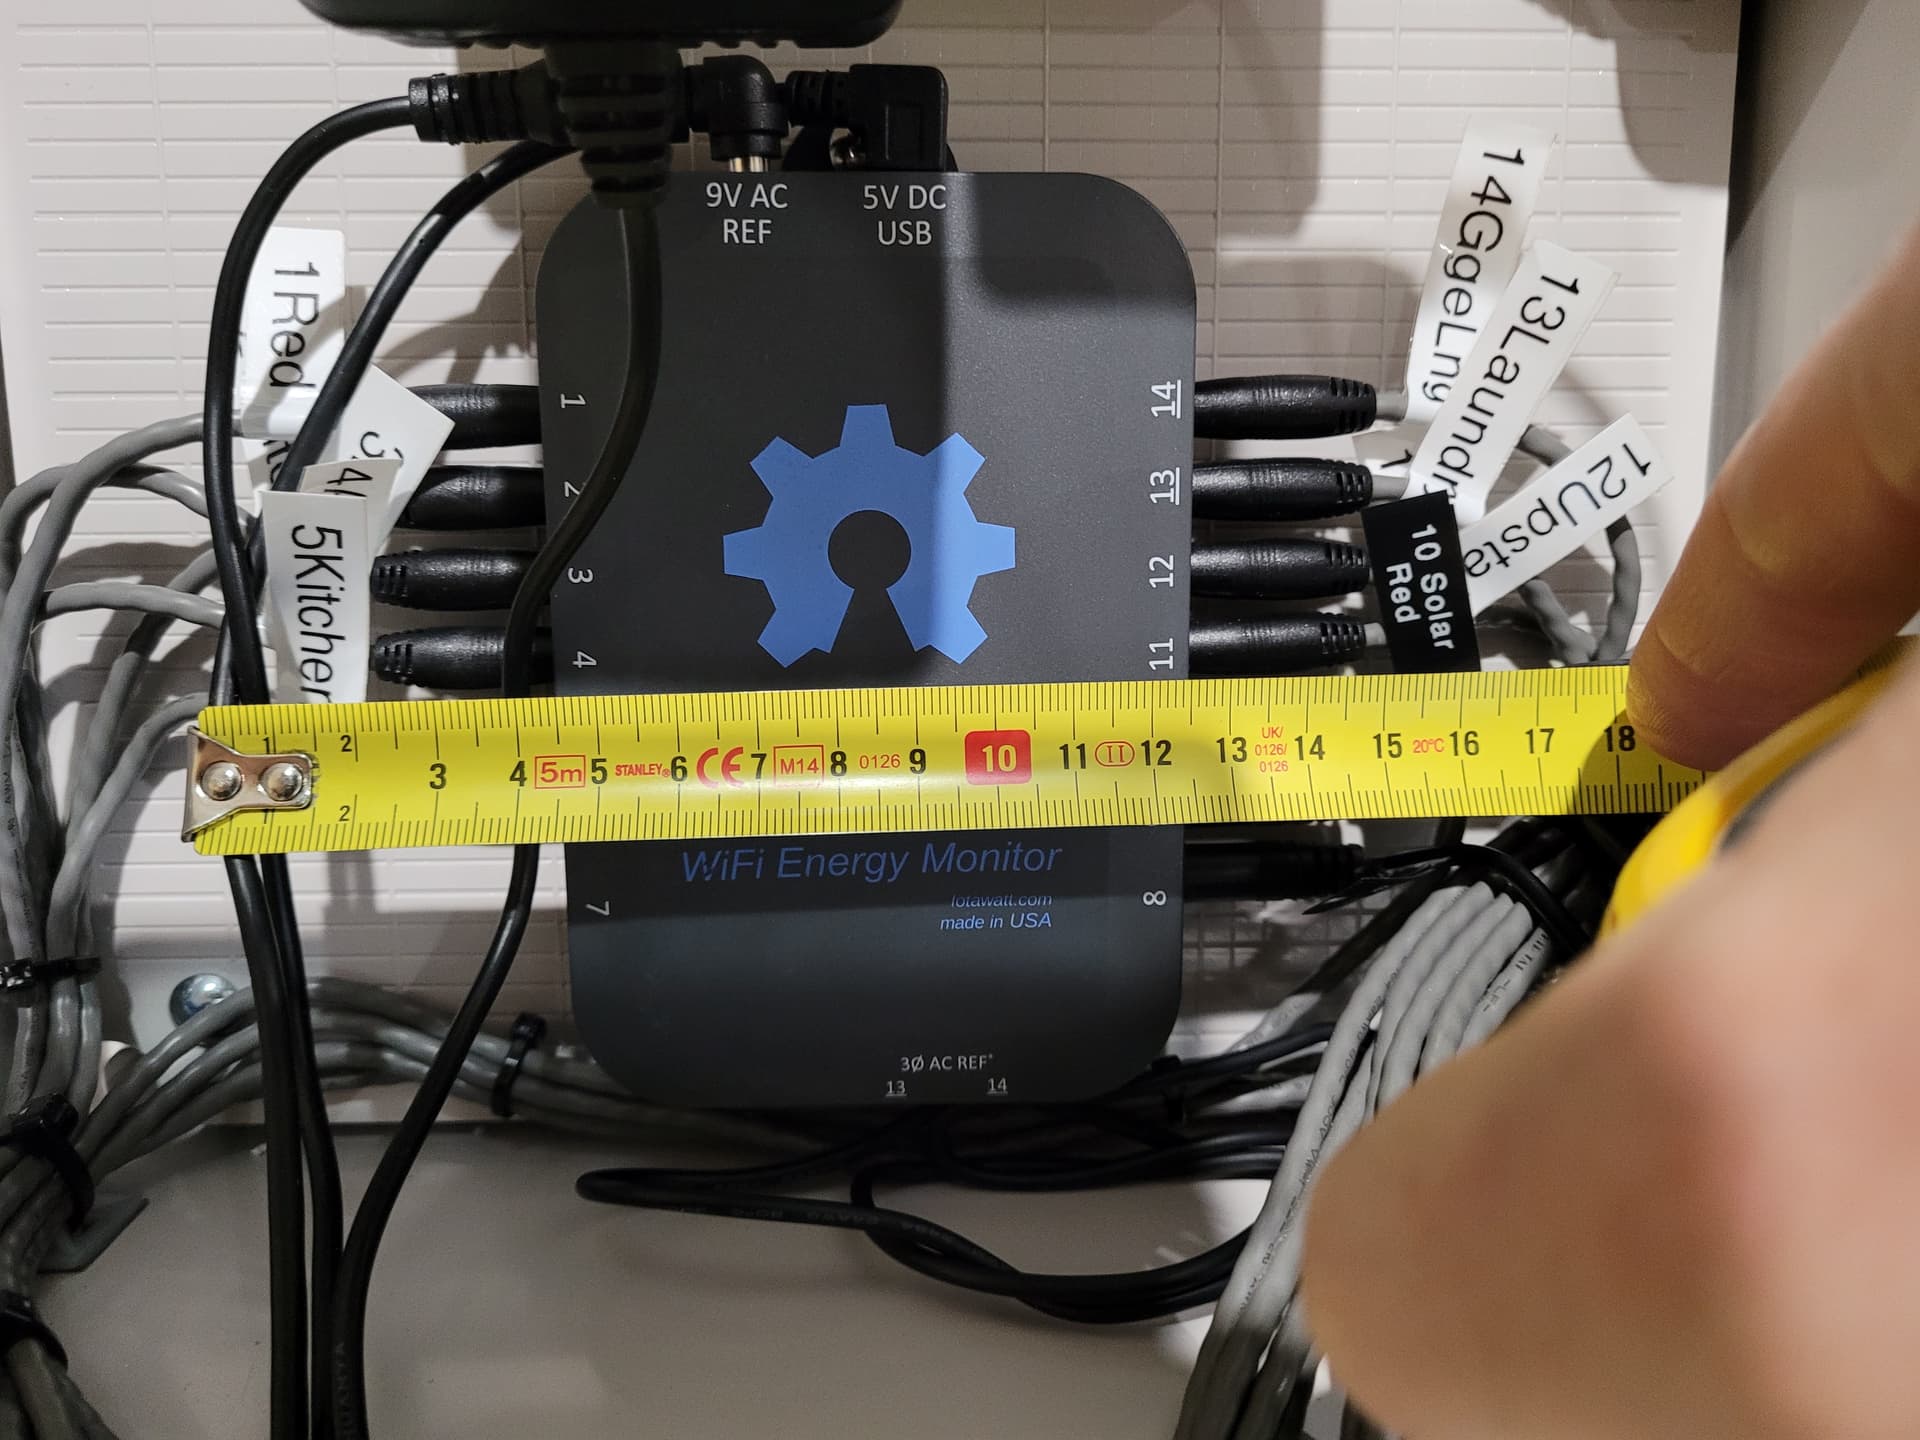
Sorry, I think I confused one of my measurements there. 160mm wide with the IoTaWatt mounted vertically should just be enough to fit the cables in. It’s about 145mm from the edge of the stereo plug sheaths on each side. Would be tight and a bit messy though. Here’s a pic of mine with a tape measure across it…