Just about to pull the trigger on one of these, just having a sparky work out how it’ll be installed in my wall (the junction box is inside my apartment, but in a corridor, so working out how to avoid anything sticking out of the wall).
The IoTaWatt will be connected to a wifi network broadcast from a Raspberry Pi, which will host a InfluxDB instance for the data to feed through to, however it will not bridge an internet connection through to anything connected wirelessly to the Pi.
Is it possible to download firmware updates from the website on the Pi, and then upload them to the IoTaWatt via the web interface, or via ssh? Or when I wish to update the IoTaWatt, will I need to temporarily connect it to my primary wifi network?
It is possible to upload and install a firmware release from a browser.
Other considerations are that IoTaWatt should have access to a time server as the clock can drift up to several seconds per day otherwise. Also, you will not be able to use graph+ to look at the data in the IoTaWatt data because it will not be able to access the CDN with various JavaScript modules.
While IoTaWatt can run fine for a few days if the internet is not available, I don’t recommend running it perpetually that way.
I do have a time server running on the Pi just for these sorts of things. I found the same sort of slip with some ESP32s I have running on this network a little while ago.
Other than the time slip and Graph+, are there other issues likely to arise without an internet connection?
This network is twofold in purpose:
hides away IOT devices that aren’t secure and/or are prone to becoming parts of botnets (such as my air conditioner that transmits passwords in plaintext http headers, or the TV that will accept binaries for anywhere without questioning it)
gives a central point of communication for IOT devices what would be staying when I move out, like the air conditioner, light switches, smart outlets, and soon, the IoTaWatt. Just making it so any new owners don’t need to spend a pile of time getting access to the data and convenience I installed these devices to provide, so they don’t go to waste
Home Assistant OS, which I’ve set up on the Pi as the dashboard and control hub, doesn’t give me any way to VLAN it up as far as I’ve found yet, though if I find a way to do it then this all becomes moot as I’d just let the IoTaWatt through
Just the firmware updates, which you can do manually.
IoTaWatt uses time(n).google.com for NTP. So you would need to direct that to your time server. There is no mechanism to change the server name.
I can’t guarantee absolute security, but with respect to becoming part of a botnet, the firmware update is signed with a private key that is air-gapped from the internet. I keep the signing device locked away and use it only to sign release blobs. The public key of course is in the open-source firmware. I think it’s pretty secure and the firmware does not have any other OTA update capability. There is always the underlying ESP8266/arduino core, but it also is open source and compiled with the firmware release.
Access to the device, while not TLS uses digest authentication when passwords are enabled. The password is never sent to IoTaWatt, instead a one-way digest is stored. It’s not perfect, and is based on md5 so not the best, but pretty good.
I don’t know how your influx or HA fits into the topology, but seems like you need to cross that boundary somehow. I would suggest just running an nginx reverse proxy to make the IoTaWatt use TLS to the internet if possible.
I’m not actually too worried about the security side with IoTaWatt. Large scale appliance makers that just are tacking in shiny features that involve the internet tend to not think about security, and rarely will spend any time, money or effort supporting the products that are already out there when they could be investing in new products for people to buy instead, but open source projects like IoTaWatt:
have reviewable code so security flaws are often quickly found and disclosed by the open source community, and are also auditable for the same reason
tend to be on a scale that word of mouth matters, so inherent shortcomings have a bigger reputation impact
often have more tech savvy users who engage with the project to help improve it for long periods of time, avoiding stagnation (at least once they get a bit of following)
So I have a lot more trust in the quality of your code than most of my other internet connected gadgets
Your frequent, positive presence supporting users in this forum only increases that.
The only reason I’m putting the IoTaWatt on that network is so that if I sell up in the next few years, which is getting more likely, it will not need complete (or partial) configuration by the next owners to continue delivering on its purpose, and I’d rather it not go to waste just because it isn’t of particular interest to them. This really is one of those things that a lot of people wouldn’t see much value in as a theoretical, but if it’s already generating the data then it quickly becomes apparent how valuable it is, so I feel leaving a low barrier for entry just makes it more likely it will be used if that eventuates.
The nginx idea does sound like something I could rig in through, I’ll look a bit at that and see what I can do. If I can make it zero maintenance, so it won’t stop working if I’m gone, then it’s totally in
Speaking of your positive support
And I’m not even an actual customer yet!
Is there a document I’m not finding that says HOW to do a manual firmware update?
I’ve got my HomeAssistant and various sensors/cameras/etc on an isolated VLAN and I’d like to stick the IoTaWatt on the same network segment to simplify my life (vs having “just one” thing on a different VLAN) but I can’t figure out where to look for seeing what version it has, is current, or where you’d upload it.
I already have my own GPS NTP server (TimeMachine TM1000A) and set my router up to intercept requests on port 123 and redirect them to my local timeserver so things should all be able to get time.
Right now the only thing I seem stuck at is how to check and update the firmware manually…
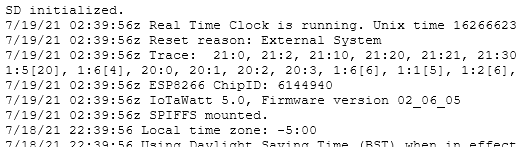
Your firmware version is displayed in the Statistics tab of the Status display:
You can also see it in the message log in the boot sequence:
The easiest way to install new firmware is to set the auto update class as follows. Your system should update immediately.
02_06_05 ALPHA or BETA
02_06_02 MINOR
02_05_12 MAJOR
Changes are posted in the NOTICES catagory.
If you want to manually install a different release:
First set auto-update to NONE so that it will not automatically revert.
Just today I realized you can actually edit the HTML in the tools section for the graph app, which would make it much easier to cache the data locally for graph2. I have a similar segregated IoT WiFi/VLAN and HomeAssistant. My desire to cache the graph2 files is that I have a tablet that is not allowed internet access; I don’t have a big issue with the IoTaWatts having internet access.
there is not any firmware files in that address:http://iotawatt.com/firmware/bin/,i look in github but comes like firmware.bin,can you help to update manual mode,thanks
The instructions above are for manually installing a packaged release of IoTaWatt firmware and related files. The firmware .bin files available in the Github repo would need to be flashed using ESPTOOL. I use that implicitely with VScode/PlatformIO during development. Instructions for using ESPTOOL standalone to flash an ESP8266 are generally available on the internet.