Seeking information on this Emoncms dashboard style

I am new to Iotawatt and am getting ready to order a US system. I have seen the following dashboard image on the Emoncms website, and am wondering if this dashboard is something specially designed for a specific individual’s own private use, or if it is something readily available to anyone, so I could download it for use on my own local emoncms server I would like to set up here.

Edit-

Doing more research, it appears this is called a dashboard for Emoncms, and dashboards are available as part of the software downloadable from Github. All this is fairly new to me. Once I get into this, I hope to run the software locally on a Windows 10 PC I have that already runs 24-7 for a few other tasks.

Any information to help me sort all this out will be appreciated. :slight_smile:

That is a sample of my ever changing dashboard and I would be happy to assist when you are up and running. All of the energy items come from the IoTaWatt (mostly the dials) and the other data is pulled from my weather station using a SDR (Software Defined Radio) pulling it via 433mhz. You are correct that it is from the standard Dashboard in EmonCMS. I use the locally hosted solution on a Raspberry Pi 3B+.

Here is what the current looks like as I have added my home battery and smart meter to the dashboard. I am also working on getting a feed from my inverter so I do not have to go out and read my meter for submission of my generation to the state for credits at the end of each month. Not fun when it is cold and snowy. :slight_smile:

Thank you very much for the information, and offer to help me set things up! I’m sure I’ll need some help along the way. However, right after my order arrived our oil furnace began failing, and after long hours spent by 4 different repair techs trying to revive it, we will have to get a new furnace. So things are rather hectic right now. Once things settle down back to normal, I will have the time to start installing my new IotaWatt system. I hope I can get back to you at that time, whenever it may be, for some help as needed.

Thanks!

Hi quella,

I have my IotaWatt installed now, and can see its Power Monitor data via website. I have a link to a page telling how to install EmonCMS. There are a ton of Visual C ++ packages it’s installation says it requires, but there seems to be an error in that list, as the first ones (Visual C++ 2008 SP1) are unavailable at the links shown. I manages to search for Visual C++ 2008 SP1 and found what I hope are the correct files from MS. But as I stepped through installing each pkg, the first several are reported by Windows 10 on my PC as already installed. So I kept going and installed only the ones that did not ask if I wanted to “restore” the pkg. The provided check utility shows all required packages as installed correctly.

I am following this guide:
https://github.com/emoncms/emoncms/blob/master/docs/WindowsInstall.md
and it is telling me to do something I can’t find. Where it shows:

“On Wampserver, enabling mod-rewrite is simply a case of left-click on your Wamp icon and hover on Apache, then hover over Apache Modules, then click PHP, then click on rewrite-module (you’ll need to scroll down the list - it it’s ticked, it’s enabled). Do a restart all services on Wampserver.”

When I hover over Apache Modules, there is no PHP listing in the very long list that appears. There is mention of PHP if I scroll all the way to the bottom, but clicking on that says something about not disabling PHP, so I don’t think I am seeing the desired result in this step. There isn’t anything there about a rewrite-module.

Can you help me get past this?

OK, there is a listing for rewrite-module, and it is already checked. So maybe these instructions are wrong?

In the enabling get-text part, I have a similar issue. The line I am finding is not exactly the same as the “extension=php_gettext” mentioned in the guide. It just shows extension=gettext, and is not remmed out.

@FigGhost, I’m sorry to say that I did not install the EmonCMS server on a Windows system. So, your install is not something I’m not familiar with. My local install is running on a Raspberry Pi (small computer) system which uses a flavor of NIX for the operating system. There may be others on this forum that have done Windows installs, but that is outside of my knowledge sorry.

Ok, well thanks anyway for offering to help.
I do have two Raspberry Pi boards here, but I am currently not working with them. How easy was it to set things up on a Pi? I may consider that route if I am not successful trying it with Windows. Did you follow any online instructions I could check out?

I followed (and continue to follow for upgrades) the documentation here:https://github.com/emoncms/emoncms/blob/master/docs/RaspberryPi/readme.md

Some needs updating if you are looking to install the latest OS on the Pi, I’m still using Stretch. However at the top of the page is a NEW Script based install which sounds rather easy from following the manual steps I took.

I do have EmonCMS (10.1.10) running on Windows, first using WAMP, now under IIS.
For IIS, I started on a system that was running WordPress (rather easily installed using IIS “Web Platform Installer”) - which included MySQL & PHP, with most of the appropriate configurations.
For WAMP, yes, I think the instructions are a bit old - vague memories that those extension changes you are seeing are PHP 7 vs. PHP 5.
Thanks, Sandy

Hi SandyB

I don’t know anything about PHP, so maybe one of you can help me out. I am slogging along, and trying my best to get things set up. I got to the part in the aforementioned guide that has me open http://localhost/emoncms in my local browser, and I get this pair of error messages:

( ! ) Fatal error: Uncaught Error: Class ‘Redis’ not found in C:\wamp64\www\emoncms\index.php on line 34
( ! ) Error: Class ‘Redis’ not found in C:\wamp64\www\emoncms\index.php on line 34

I looked in the file it is referring to, at line 34, but I don’t know what it is trying to tell me. Here is that section of the index.php file, starting with line 32:

// 2) Database
if ($settings['redis']['enabled']) {
    $redis = new Redis();
    $connected = $redis->connect($settings['redis']['host'], $settings['redis']['port']);
    if (!$connected) { echo "Can't connect to redis at ".$settings['redis']['host'].":".$settings['redis']['port']." , it may be that redis-server is not installed or started see readme for redis installation"; die; }
    if (!empty($settings['redis']['prefix'])) $redis->setOption(Redis::OPT_PREFIX, $settings['redis']['prefix']);
    if (!empty($settings['redis']['auth'])) {
        if (!$redis->auth($settings['redis']['auth'])) {
            echo "Can't connect to redis at ".$settings['redis']['host'].", autentication failed"; die;
        }
    }
    if (!empty($settings['redis']['dbnum'])) {
        $redis->select($settings['redis']['dbnum']);
    }
} else {
    $redis = false;
}

I know a little about programming in languages like C++ and Python, but not enough to help here. It says a Class is not found, which has me guessing that the above code is missing some kind of declaration statement? What might I need to do here?

There are Redis implementations available for Windows (and you’ll need the PHP Redis extension - which is what I think it’s actually complaining about there), but initially, I’d just turn it off in settings.php:
// Redis Database (used as a cache for improved performance)
“redis”=>array(
‘enabled’ => false
),

Thank you SandyB! Disabling Redis got me past those errors, but now it shows:

" Can’t connect to database, please verify credentials/configuration in settings.php
Error message: Access denied for user ‘Zoandar’@‘localhost’ (using password: YES)"

I have my username (Zoandar), localhost, database name emoncms, created in an earlier step of the guide I’m following, and my password correctly entered into both settings.ini and settings.php. Any idea why its locking me out?

Would need to see exactly what you did in MySQL. What you’ve got sounds reasonable.
Just for comparison, here’s the settings.php.txt (2.9 KB) I’m running.
I would check that your new user has access specifically to your database.
Not sure about settings.ini - I don’t have one!

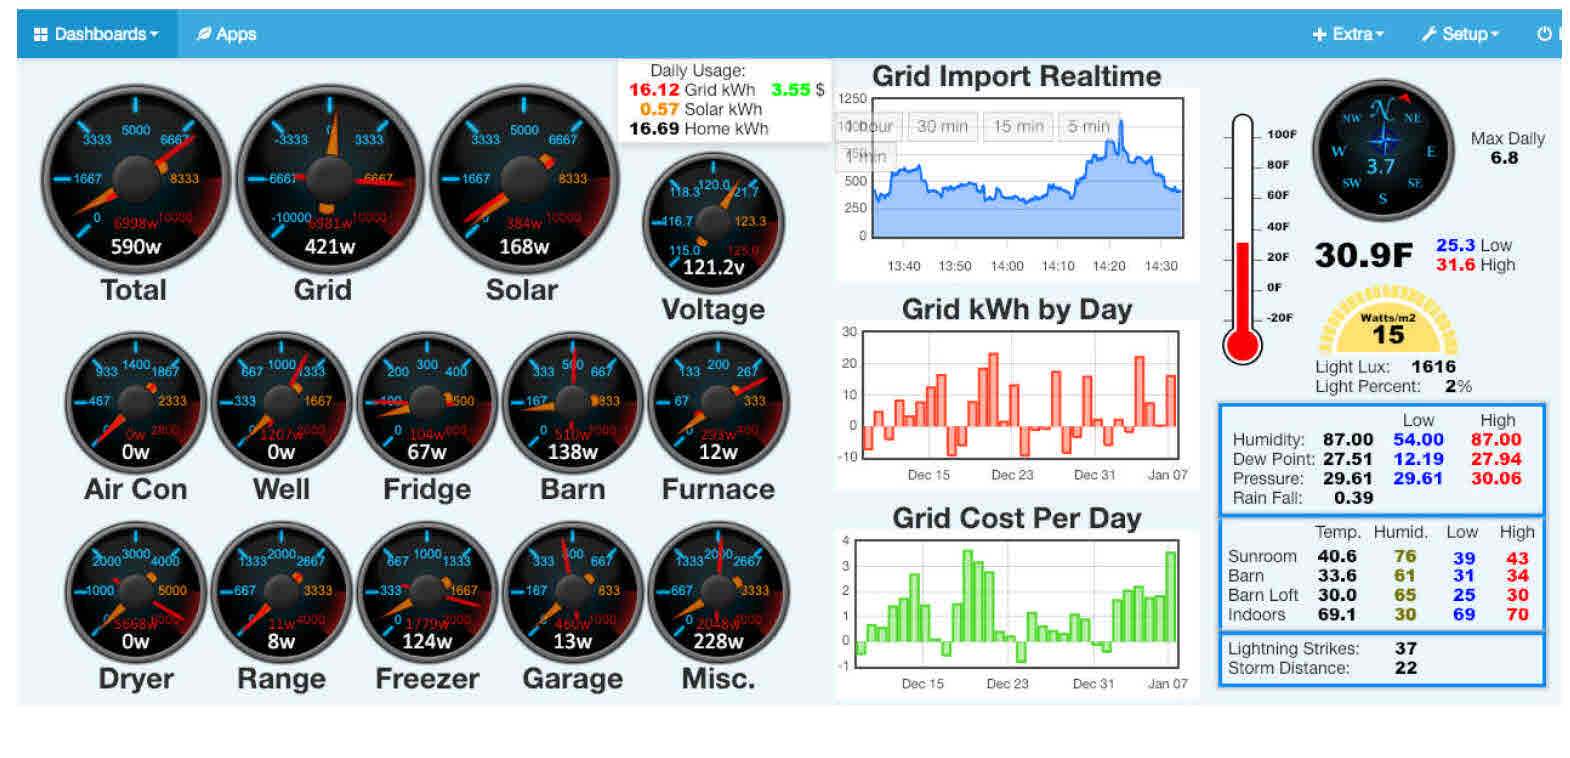
I am admittedly confused and overwhelmed by phpMydmin. Here is a screen shot of the results from my creating the database as per the guide. I think.

As near as I can figure out, every listing here (why are there so many???) has full access privileges from user zoandar. So I don’t see what might be wrong. Here is the content of my settings.php file, with the password removed for this posting:

"<?php
// -----------------------------------------------------
// Example emoncms settings.php file
//
// default-settings.php contains the default settings.
//
// Settings entered here override the default settings.
// Enter only the settings you wish to customise here.
//
// The following is a barebones example, copy across
// other settings from default-settings.php as required
// Maintain the section structure (items in )
// -----------------------------------------------------

$settings = array(

// MYSQL Database settings
“sql”=>array(
“server” => “localhost”,
“database” => “emoncms”,
“username” => “zoandar”,
“password” => “xxxxxx”,
“port” => 3306,
// Skip database setup test - set to false once database has been setup.
“dbtest” => true
),

// Redis Database (used as a cache for improved performance)
“redis”=>array(
‘enabled’ => false
),

// MQTT Used with emoncms_mqtt service to send and receive data over MQTT
// If MQTT settings are changed reboot or execute “sudo systemctl restart emoncms_mqtt.service”
“mqtt”=>array(
‘enabled’ => false,
‘user’ => ‘’,
‘password’ => ‘’
),

// Feed engine settings
“feed”=>array(
// Supported engines. List engines by id to disable feed creation.
// Existing feeds with a hidden engine still work
// If using emoncms in low-write mode, ensure that PHPFIWA is disabled
// MYSQL:0, MYSQLMEMORY:8, PHPTIMESERIES:2, PHPFINA:5, PHPFIWA:6, CASSANDRA:10
// 5:phpfina and 2:phptimeseries are the recommended emoncms feed engines
‘engines_hidden’=>array(0,6,10),
// Buffer data to be written to
‘redisbuffer’ => array(
‘enabled’ => false,
‘sleep’ => 60
),
‘phpfina’ => array(‘datadir’ => ‘/var/opt/emoncms/phpfina/’),
‘phptimeseries’ => array(‘datadir’ => ‘/var/opt/emoncms/phptimeseries/’)
),

// Enable the graph module if you have it installed
“interface”=>array(
‘feedviewpath’ => “graph/”
),

“public_profile”=>array(

),

“smtp”=>array(
// Email address to email proccessed input values
// ‘default_emailto’ => ‘root@localhost’,
// ‘host’=>“smtp.gmail.com”,
// 25, 465, 587
// ‘port’=>“465”,
// ‘from_email’ => ‘noreply@emoncms.org’,
// ‘from_name’ => ‘EmonCMS’,
// comment lines below that dont apply
// ssl, tls
// ‘encryption’=>“ssl”,
// ‘username’=>“yourusername@gmail.com”,
// ‘password’=>“yourpassword”
),

“log”=>array(
// Log Level: 1=INFO, 2=WARN, 3=ERROR
“level” => 2
)
);
"

For the Zoandar user, database-specific, can you see what database it has those permissions to?
(It looks like there’s a zoandar schema as well, worried the permissions might be to that rather than emoncms) - though ‘global’ sounds like it should be enough!
For ‘root’, it looks like they don’t want to allow it to connect from anywhere external (outside your machine), but you could reference your machine any of those 4 ways, and they want to allow all of them (so need to be done separately).
In your settings.php, all your path names look to still be for UNIX, you’ll want to change them to match your Windows install - at least once you get past the database issue!

Thanks SandyB.

Before I dig further into the Windows attempt, I downloaded and burned the emonSD-17Oct19 image file to a 64GB blank MicroSD card, and booted my PiTop notebook with it. I am sitting at a login, but I can’t find any information on the default login for this image. Is there a guide for using it? All I found on the raspberry pi link above led to this image download, and discussed older versions, etc, but no instructions how to use it. edit - OK, after some googling I found it here:

user name is ‘pi’ and password is ‘emonpi2016’

I’ve got emonpi up and running. But when I go into the setup part, I am totally confused. My IotaWatt is sending data to its locally run website. But I don’t understand how to make it talk to empnpi. I’m trying to follow the guide at EmonPi Install Guide — OpenEnergyMonitor 0.0.1 documentation and I got to the Log Locally part. But where it says “You should now see an updating input list of connected nodes” the page is blank. apparently emonpi isn’t getting data from the Iotawatt, and I don’t know how to make them connect.
Quella, can you help me out here?

Did you copy the API key from the Feed API section to the IoTaWatt and start the service on the IoTaWatt? Here are a few samples of places to get that info. All communication is via the API key and you want to use the Read/Write Key. Make sure that is in your IoTaWatt setup for that service.

Find your key by going to the following location in the Inputs section:

Copy and paste the API R/W key that shows up for you on this page. I masked mine out for security purposes. It will be a string of numbers and letters and you need to copy them as is. This is unique to your install.

The documentation that explains it here:

https://docs.iotawatt.com/en/master/Emoncms.html

Since you have a local instance of Emoncms, using the OEM SDcard, you will need to use a server URL that points to the local Instance on the RPi:

HTTP://192.168.1.n/emoncms

(Substitute your RPi IP address)

Thanks Quella! That finally got the Inputs page populated. When I had been grasping at straws yesterday, at one point I tried adding a “new” device which of course didn’t help, but in doing so I had put its “new” APIKEY into that field on the IotaWatt server setup. I forgot to change it back. I had the correct key in there before, but at that time I think I had the wrong URL set. Anyway, I now have inputs, so onward and upward! :grin: