Hi everyone
I got my new IoTaWatt and wanted to see the measurements in HomeAssistant, I had to setup quite a few things so I thought of sharing my findings.
First a bit of overview of how things work between IoTaWatt and HA.
Luckily it’s 2020 (yeah, sounds strange to think of this, but 1 or 2 years ago this would have been a lot harder) so IoTaWatt has all the API we need and the same goes for HA, so everything does work and without too much fuss to boot!
There are three main data exchanges that we need to setup:
- accessing IoTaWatt API to get the data out of it, it’s gonna be in JSON format
- creating a sensor in HA to extract the data from IoTaWatt (at this point it’s one huge blob with everything in it)
- creating multiple additional sensors in HA to split the data blob from point 2 and make it actionable and manageable
Preamble
Make sure your IoTaWatt output configuration has all channels with lower case names. Using the steps below, HA will complain if you use different capitalization, for whatever reason.
Step 1
You might have setup an admin password for your IoTaWatt, if that’s the case you also have to setup a user password (you don’t want your admin password written in plain text in some config file, do you?).
If not, then you don’t need anything else.
First thing is to test your connection, for this I’m assuming a Linux/MacOS command line, Windows will be a tad different.
If you don’t have them already, install curl and jq.
Now in your commandline you can type
curl -u user:password 'http://youriotawatt/status?inputs=yes&outputs=yes' | jq .
Here we instruct curl to use the mentioned username and password (hint: username is always user for IoTaWatt unless some changes happen in the software, the password is the user password you set before) to get the status of inputs and outputs from your IoTaWatt (mind changing the address so that it matches your setup), we then pass the raw output to jq which takes it and just displays it nicely like so:
$ curl -u user:pass 'http://myiotawatt/status?inputs=yes&outputs=yes' | jq .
% Total % Received % Xferd Average Speed Time Time Time Current
Dload Upload Total Spent Left Speed
 100 1462 100 1462 0 0 5166 0 --:--:-- --:--:-- --:--:-- 5166
   [
      {
        "channel": 0,
        "Vrms": 231.0878,
        "Hz": 49.98795,
        "phase": 1.48
      },
      {
        "channel": 1,
        "Watts": " 0",
        "Pf": 0,
        "phase": 1.4,
        "lastphase": -0.08
      }
    ]
this is a nice way to play with json formatting, for example you can do something like
$ curl -u user:pass 'http://youriotawatt/status?inputs=yes&outputs=yes' | jq '.outputs[2:3]'
[
  {
    "name": "frequency",
    "units": "Hz",
    "value": 50.01644
  }
]
which means take the outputs section, and show only the items between 2 and 3 excluded (so only 2 basically), and in my config that’s the line frequency.
Now everything is ready for step 2
Step 2
Now we get to HA. As we said in the beginning, we need a global sensor to pull data out from IoTaWatt, this sensor is going to be a rest(ful) sensor
So somewhere in your config.yaml, find or create the sensor: domain and add to it like so
  - platform: rest
    name: IoTaWatt
    resource: 'http://youriotawatt/status?inputs=yes&outputs=yes'
    json_attributes:
      - inputs
      - outputs
    value_template: '{{ value_json.inputs[0].Vrms }}'
    device_class: voltage
    scan_interval: 5
    authentication: digest
    username: user
    password: password
you can test your value_template using curl and jq: in HA you need to put something that points to a numeric value that is useful, in this case input0 is the reference voltage, so I’m extracting the line voltage.
In curl this would look like
curl -u user:pass 'http://youriotawatt/status?inputs=yes&outputs=yes' | jq '.inputs[0].Vrms'

230.9969
Step 3
Now in HA we have to create one sensor for each value you want to display or manipulate or do something with. In fact what comes out of step 2, is a voltage value with a lot of attributes
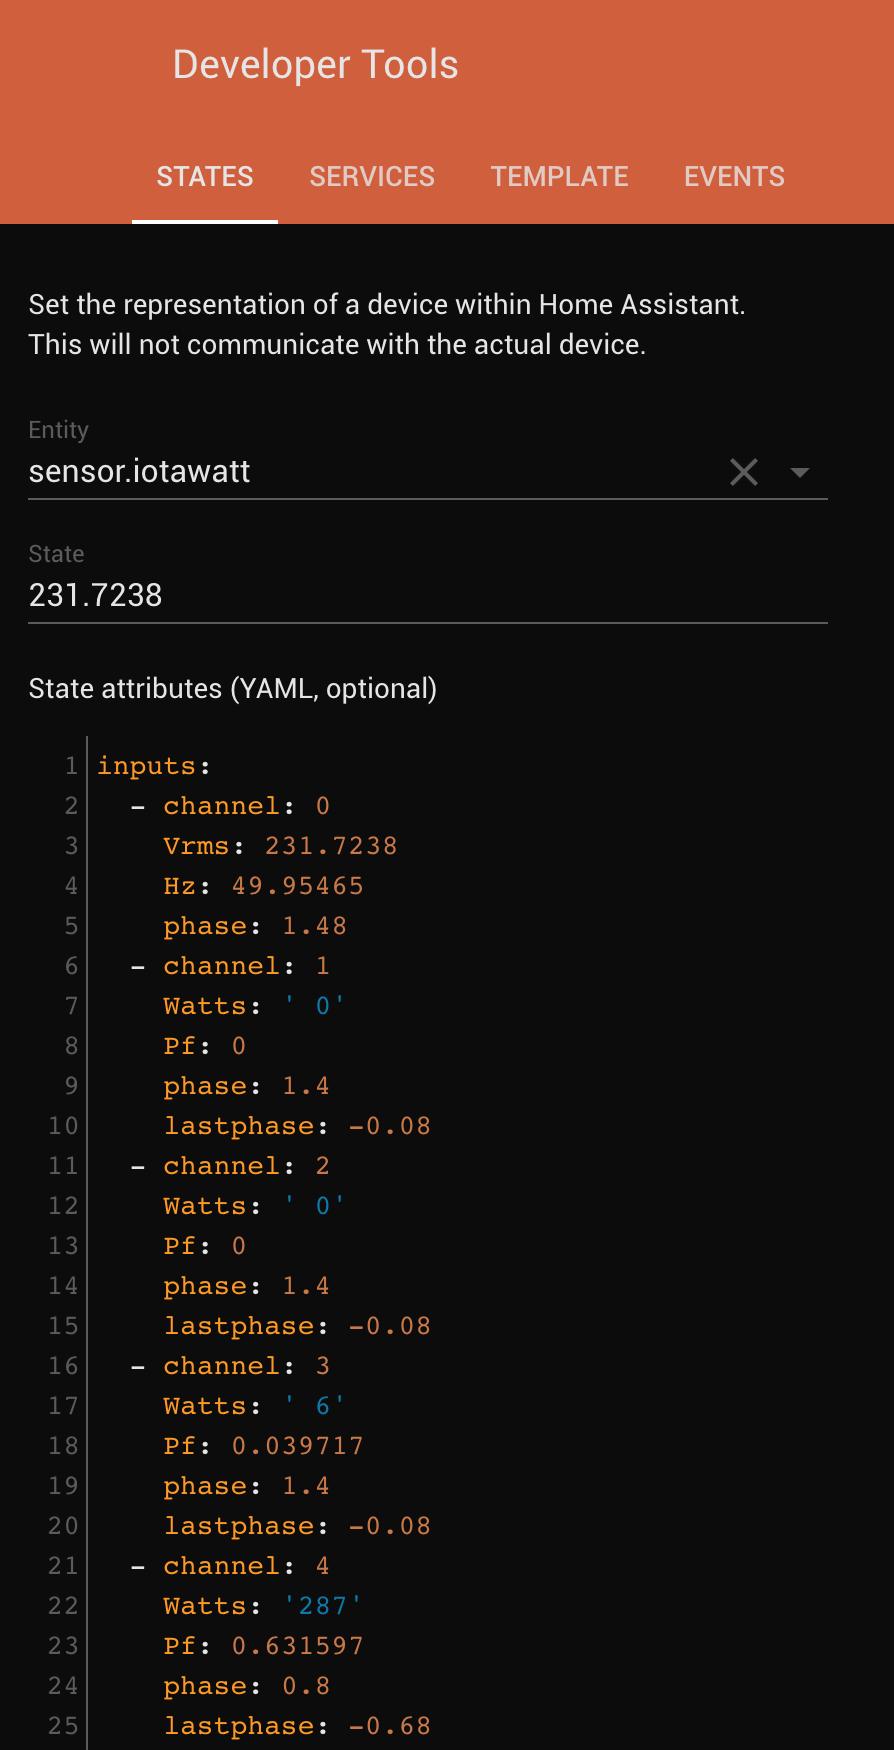
In order to be able to show what we are interested in, we need to create separate sensors.
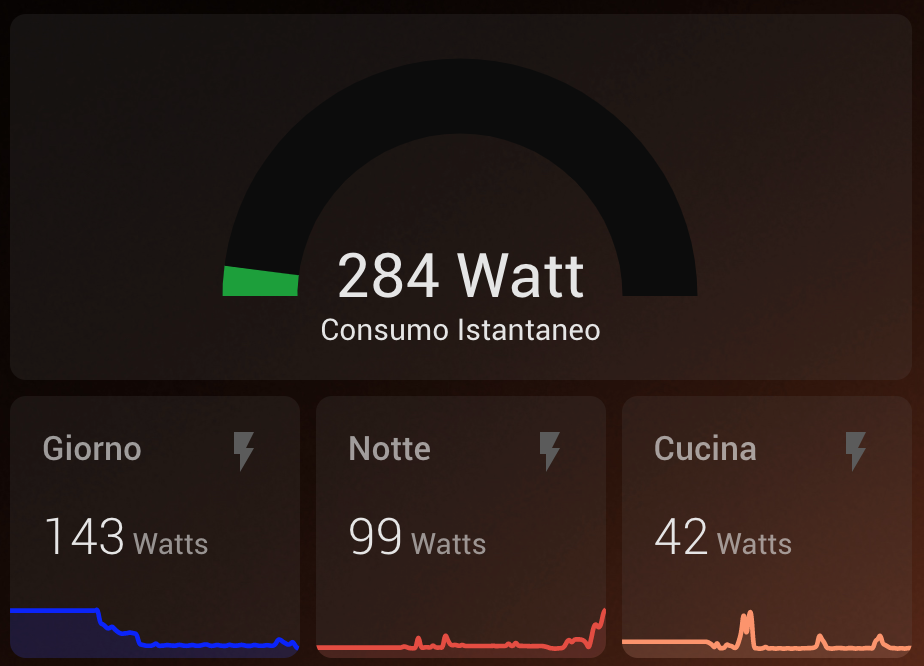
Have a look at this other picture
For those of you not blessed with the Italian heritage (poor souls, but we can’t all be perfect right?
And that’s a whole lot of writing in your config file, but fret not: templates come to the rescue!
There is a nice post on the HA community about this by Petro, the original template code is his, I made some modifications to make it more useful.
Here is the template you can put in the developer tools, template tab:
sensor:
  - platform: template
    sensors:
{%- for i in range(states.sensor.iotawatt.attributes.inputs | length) %}
  {%- set input = states.sensor.iotawatt.attributes.inputs[i] %}
  {%- if input.Watts %}
      iotawatt_input_{{ input.channel }}:
        value_template: {{'\'{{{{ states.sensor.iotawatt.attributes.inputs[{}].Watts }}}}\''.format(i)}}
        unit_of_measurement: Watts

  {%- endif %}
{%- endfor %}
{%- for i in range(states.sensor.iotawatt.attributes.outputs | length) %}
  {%- set output = states.sensor.iotawatt.attributes.outputs[i] %}
      iotawatt_output_{{ output.name }}:
        value_template: {{'\'{{{{ states.sensor.iotawatt.attributes.outputs[{}].value }}}}\''.format(i)}}
        unit_of_measurement: {{ output.units }}
        {%- if output.units == 'Watts' %}
        device_class: power
        {%- elif output.units == 'Volts' %}
        device_class: voltage
        {%- endif %}

  {%- set output = states.sensor.iotawatt.attributes.outputs[i] %}
      iotawatt_output_{{ output.name }}_rounded:
        value_template: {{'\'{{{{ states.sensor.iotawatt.attributes.outputs[{}].value | round(0) }}}}\''.format(i)}}
        unit_of_measurement: {{ output.units }}
        {%- if output.units == 'Watts' %}
        device_class: power
        {%- elif output.units == 'Volts' %}
        device_class: voltage
        {%- endif %}
{%- endfor %}
What this does, is create a ton of sensors automatically: it read the first IoTaWatt object you created, pulls all attributes (so inputs and outputs alike, and you can also add the wifi status if you want) and creates as many sensors as it finds.
I also put something a bit redundant but useful in HA: if you want to display something, decimals are unnecessary (see my instantaneous power gauge), but HA does not have the feature to choose that on the display side, so you effectively need to create another sensor with rounding.
This is what the 3rd part of the template does. You can skip it if you don’t need it.
Here is what happens with a correctly configured sensor and template
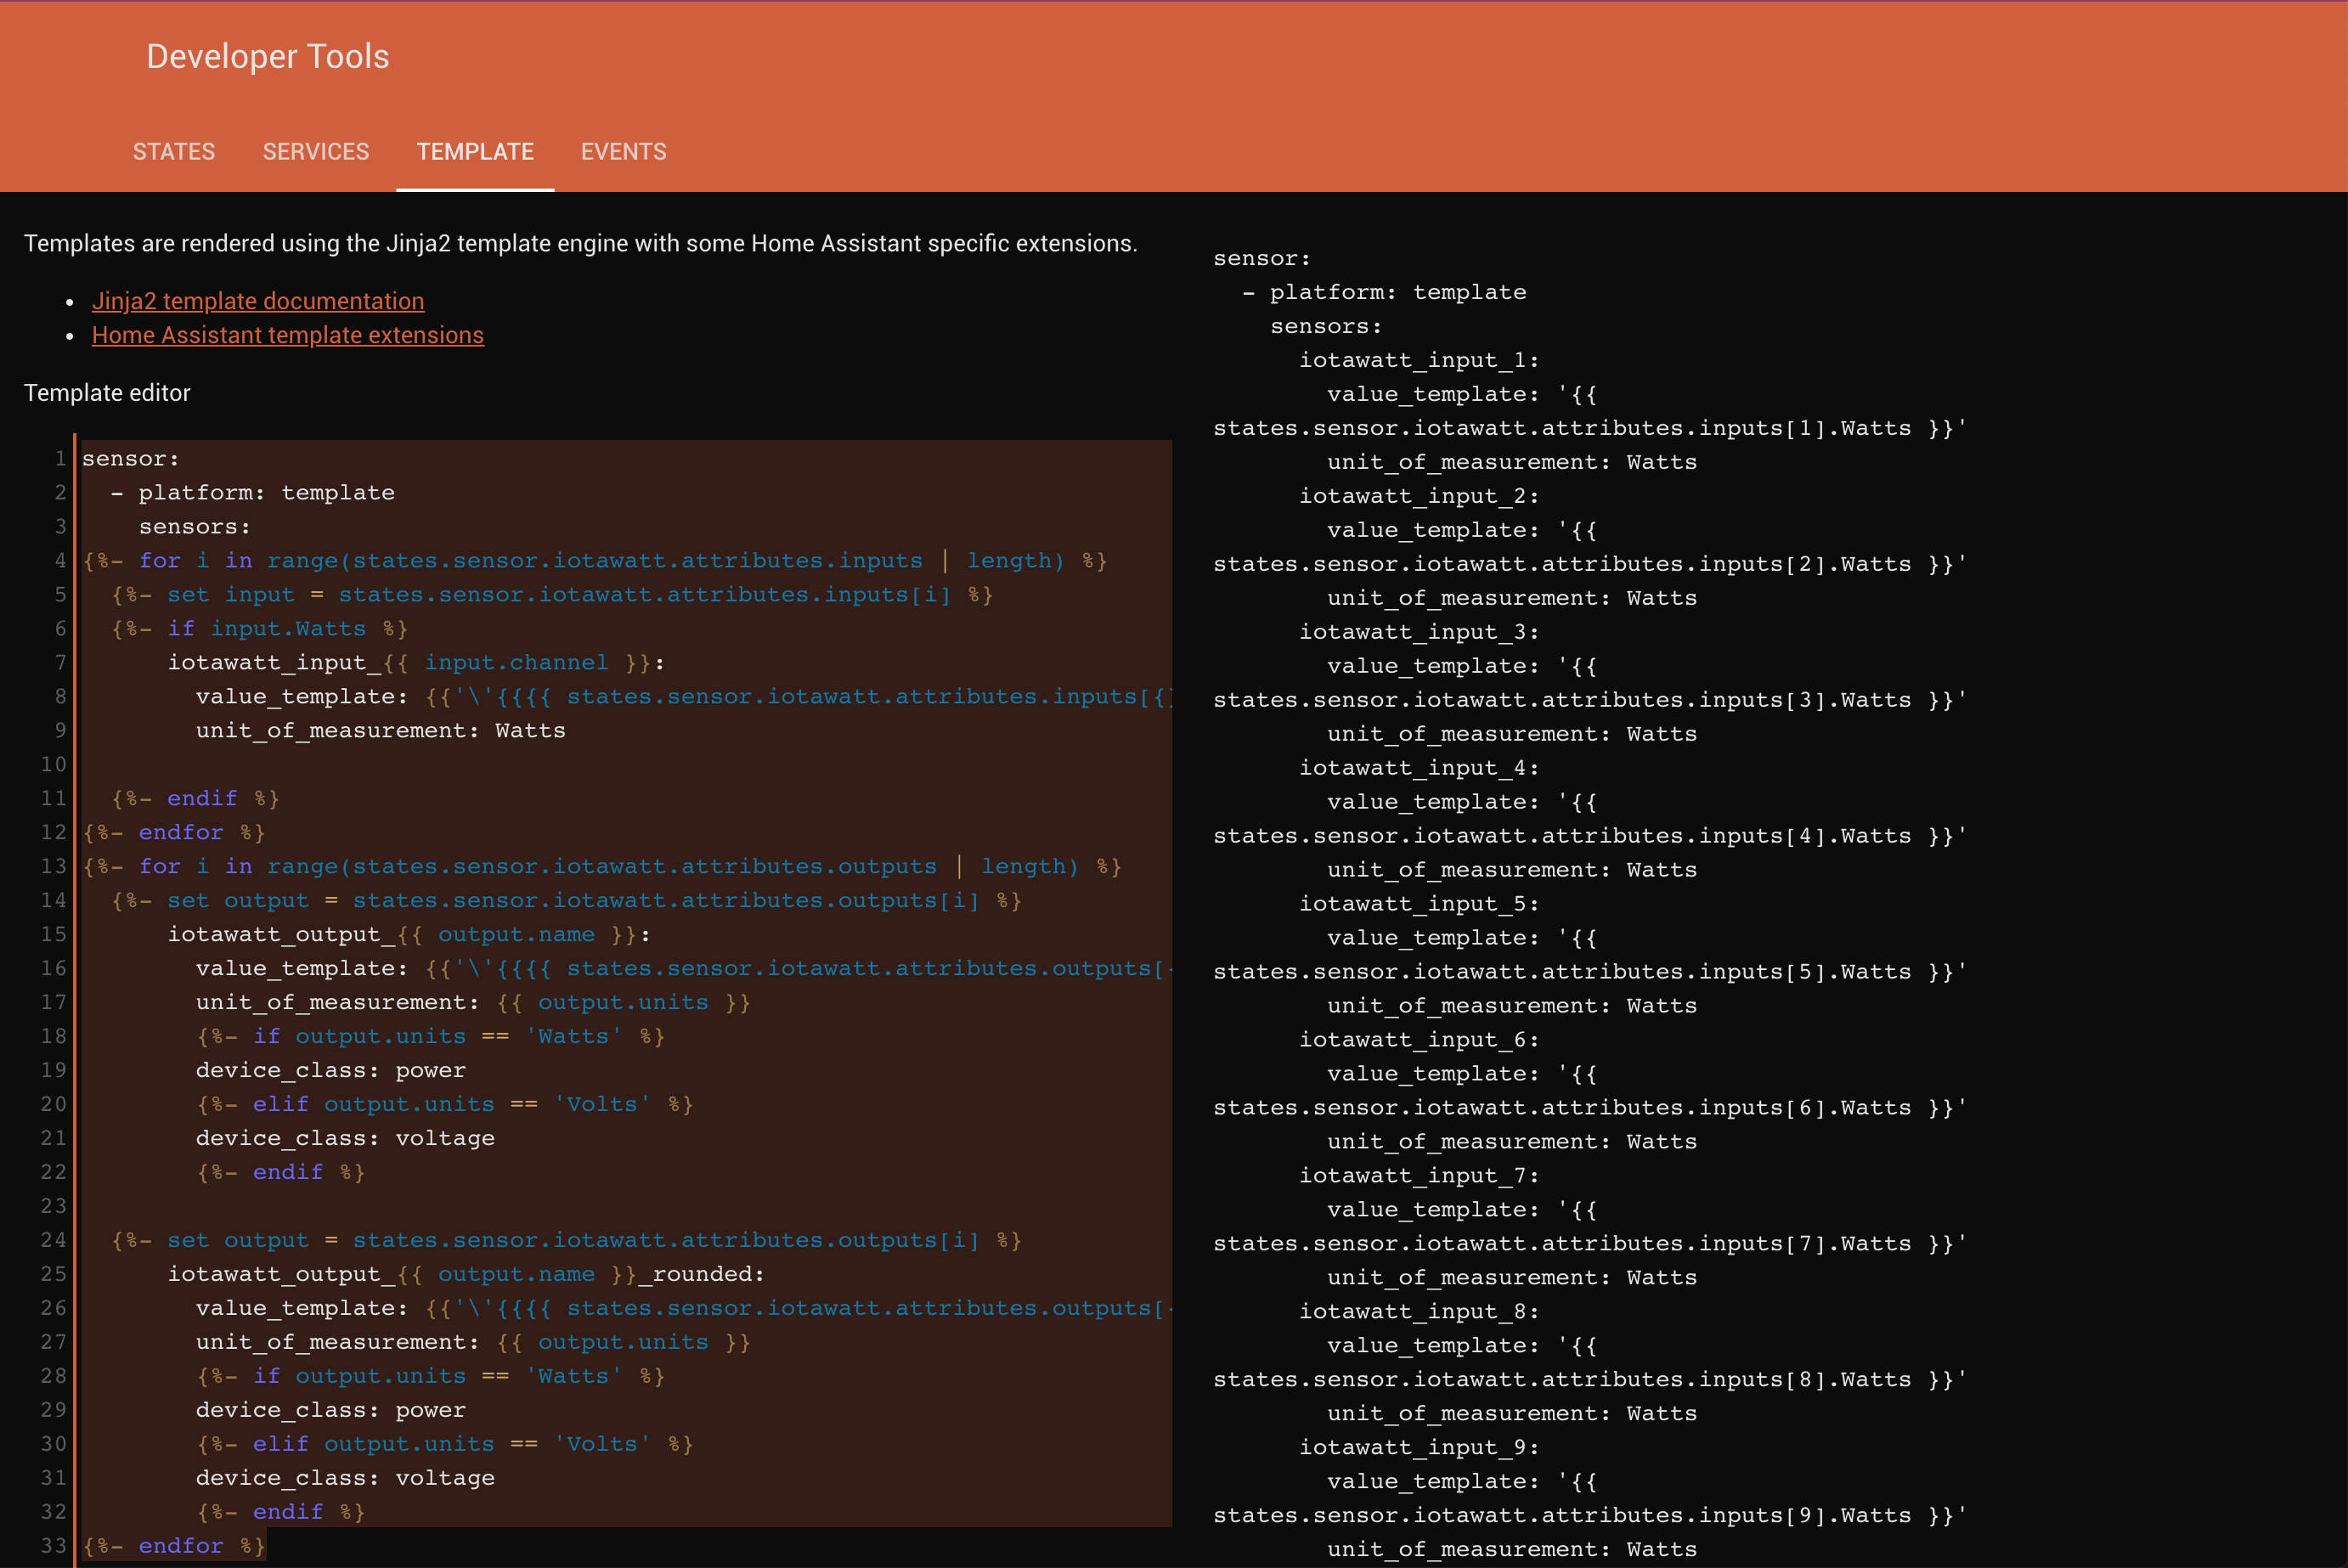
Now grab what’s on the right, paste it into the right section of your configuration.yaml and restart HA.
You’ll be blessed with a ton of sensors!

Hope this helps feeding your IoTaWatt into HA!